We finally have a currency we can use anywhere in the world!!!
In order to use Bitcoin for payment, you will need a wallet. Since Bitcoin fees can be high, and a Bitcoin confirmation takes at least an hour, the most practical way is to have a Lightning wallet. The Lightning network is a layer over Bitcoin which allows for very low fees and instant confirmation - just what you want when paying for a latte!
I hear you say "But, I don't want to spend my Bitcoin!". We are all HODLrs, so my best advice to you is to take the cash you would otherwise spend and buy some fresh Satoshis to be used for the trip. So, no guilt for having spent your Bitcoin! And the best part is that whatever is left over, you can add to your stash - what's not to like?
There are a number of Lightning wallets, and more are added every day. Where they differ is in the balance they strike between usability and centralization. One of the easiest we have found is the Blue Wallet. All you have to do is download it, create a Lightning wallet, transfer some Sats to it and you're ready to go. What you give up is the ownership of your coins (like they say, not your keys, not your Bitcoin). But, the idea with Lightning is to use it for small purchases, so consider it as cash - if you drop a $10 bill it's gone also.
In technical terms, the difference is between a Custodial wallet or a Non-Custodial wallet. If you want to keep control of your Bitcoin, you want a Non-Custodial wallet, like Eclair. In this case, you will have additional steps and responsibilities, like keeping your words secure, and you will have to open at least one Lightning channel before you can spend it. So, it's up to you what you are comfortable with. You can have as many wallets as you want, so you can mix and match. For the ultimate hard-core Bitcoiners, you can run your own Bitcoin node and Lightning Node - in which case you are depending on no-one but yourself.
How to use the Blue Wallet?
The Blue Wallet is available for all smartphones (Android, iOS), and is one of our favorite wallets to use while traveling. It allows you to start using the Lightning Network with a minimum amount of fuss.
- To start, download it from one of the links above.
- Then create a new wallet by clicking on the + on the top right hand side.
- You will be presented with a screen of options, asking you what type of wallet you want to create: Bitcoin, Lightning, or Vault.
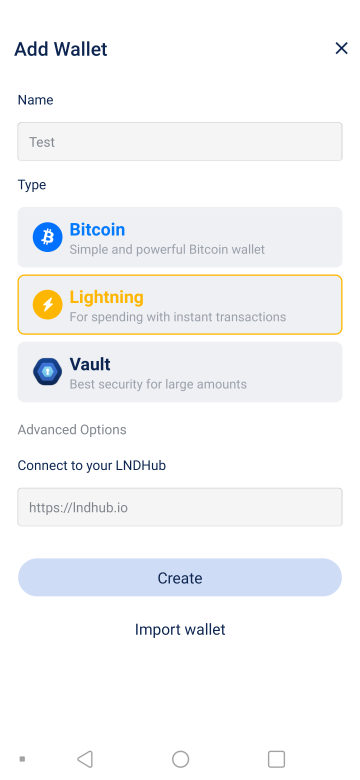
- Enter a name for the wallet (you can call it whatever you want – i.e. El Salvador trip).
- Select Lightning wallet type.
- You will be shown some Advanced Options, but for now just click Create.
- After a few seconds, you will get a message that the wallet has been created, and a big QR code on the screen. Below that, there will be a code that can be used to recover the wallet in case your phone dies or is lost.
- You are prompted to save that code. The safest way is to hand-write the code on a piece of paper and save it securely. The next safest is to save it as a secure note in a password manager like Bitwarden (which I highly recommend). We will do that in this case.
- Click on that code, and it will be copied to the clipboard.
- Open a secure note in Bitwarden and paste the code you just copied and write down what it is.
- The button at the bottom will change to “OK, I have saved it”. Click on it.
- The wallet has been created! You will be back at the Wallets screen, and your new wallet will be highlighted in orange. It will say the balance is 0 sats.
- If you click on it, a full screen for the wallet will open up.
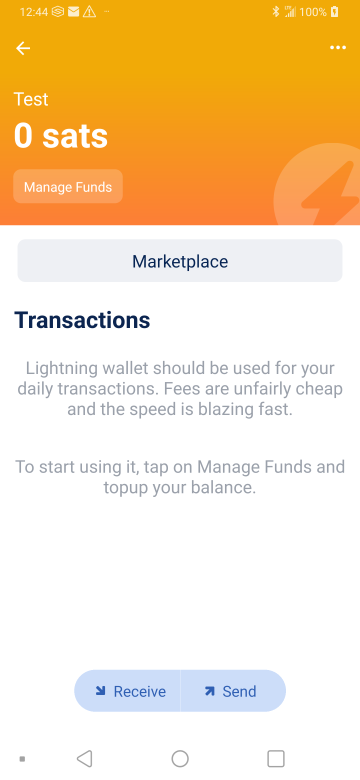
- Now we need to add some sats to the wallet. Click on Manage Funds.
- Now we have several options:
- You can Refill this wallet from a Bitcoin wallet you have created in Blue Wallet (Refill)
- You can Refill this wallet from an external Bitcoin wallet or exchange where you have BTC (Refill with External Wallet)
- You can buy some Bitcoin directly in the wallet, withdrawing funds from your bank account (Refill with Bank Card)
- Go to an external Exchange (Exchange)
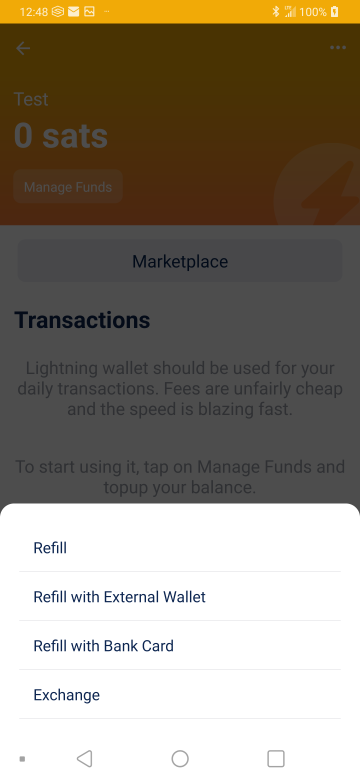
- In this case, we will select the second option, Refill with External Wallet, and transfer BTC from an exchange where we bought BTC, so click the second option.
- A new screen will open up with a QR code and a Bitcoin address where the BTC should be sent.
- Click on the address shown, and it will be copied to the clipboard.
- Go to your exchange account, select Send, and paste the address you just copied. The procedure will vary depending on the exchange, but make sure that you spot-check the address by going back and forth between the two screens. Do whatever your exchange requires you to do.
- Since this is a Bitcoin transaction, it will take about an hour to get several confirmations, but eventually your Lightning wallet will have sats and will be ready to use for instant transactions!
Now comes the fun part – how do we pay with the Blue wallet?
- Open the Blue Wallet.
- Select the Lightning wallet you want to use (you can have several).
- At the bottom of the screen, click Send.
- Have the recipient open their Lightning wallet and create an invoice with the amount they want to be paid (ie. the coffee shop tab). Their wallet will show a QR code.
- On your phone, click Scan in the middle of the screen, and scan the QR code.
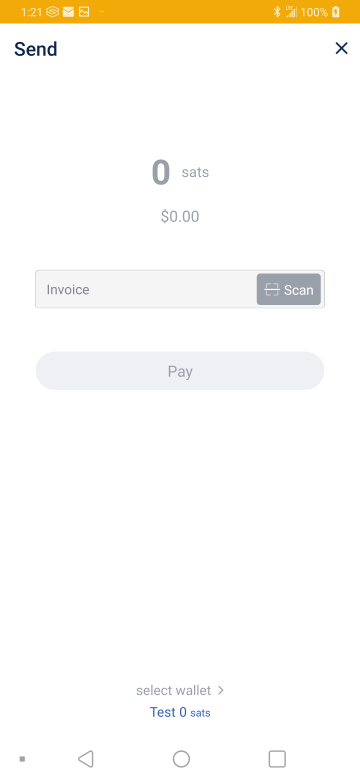
- The amount will be shown in dollars and sats. Verify it is correct (there will be some sats charged as a lightning network fee). If the recipient did not include an amount, you can enter it.
- Click Pay.
- Within a few seconds the recipient will see their invoice has been paid. That’s it!
How do we receive sats via Lightning using the Blue wallet?
- Open the Blue Wallet.
- Select the Lightning wallet you want to use (you can have several).
- At the bottom of the screen, click Receive
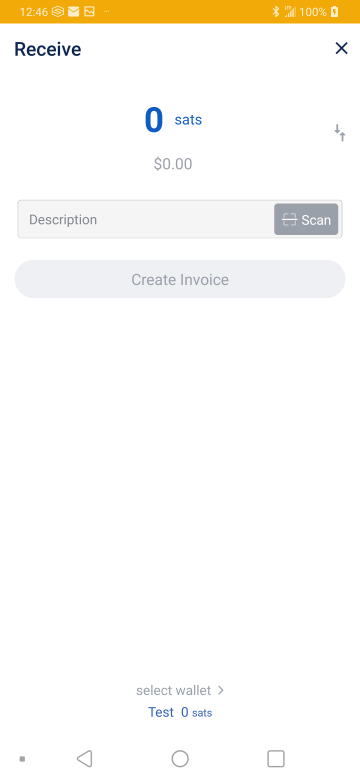
- Enter the amount. The screen defaults to sats, but you can change it to dollars by clicking the up/down arrows on the right of the amount.
- Enter a description if you want.
- Click Create Invoice. A QR code will show.
- Have the sender scan the QR code on their phone, and Send.
- Within a few seconds, you should see the transaction in your wallet.
This is a high-level overview of the simplest way to use the Blue wallet. The Blue wallet has lots of other options, including Bitcoin wallets, Watch-only wallets, Multisig, etc. See more info on their website.
In order to simplify things, Blue wallet by default creates what is called a Hosted wallet. This means that your sats are stored on their servers, under their private keys. This is similar to having your BTC on an exchange. For small amounts of money to be used for day-to-day transactions, this is OK (just like the cash in your wallet). To have full control, you would have to run your own Bitcoin node and Lightning node, and create, fund and maintain channels with other well-connected nodes. A lot of work! The Blue wallet people do all this for you, so you don’t have to worry about it – just enjoy your trip!
Other wallets take different approaches and give you varying degrees of control over your BTC. You can check out Wallet of Satoshi, Muun, Breez, Éclair, etc. If you are in El Salvador, you’re in luck! Since El Salvador adopted Bitcoin as legal tender in September 2021, there is now a Chivo wallet maintained by the El Salvador government which uses the Lightning network. Also, in certain areas of El Salvador you can use the Bitcoin Beach wallet, which is a project that has been helping Salvadoran people since 2019.
Another alternative is to use Strike. Strike uses the Lightning network in the background, but it is used to transfer US Dollars (Euros coming soon) to anyone in the world with a Strike wallet. You can use it to buy BTC, and you can transfer BTC to your Lightning wallet or anyone else’s.
BE VERY CAREFUL when downloading any crypto wallets. There are many scams out there of fake wallets that are just created to steal your crypto. Make sure you download from the Apple or Play Store, and that the wallet has lots of reviews and lots of downloads – the fake ones will be fly-by-night things.